Cyclotron Institute TAMU - Radiation Effects Testing Facility
CONTROL SOFTWARE USERS GUIDE
(Written by Vladimir Horvat - updated on October 20, 2021)
Define Layers

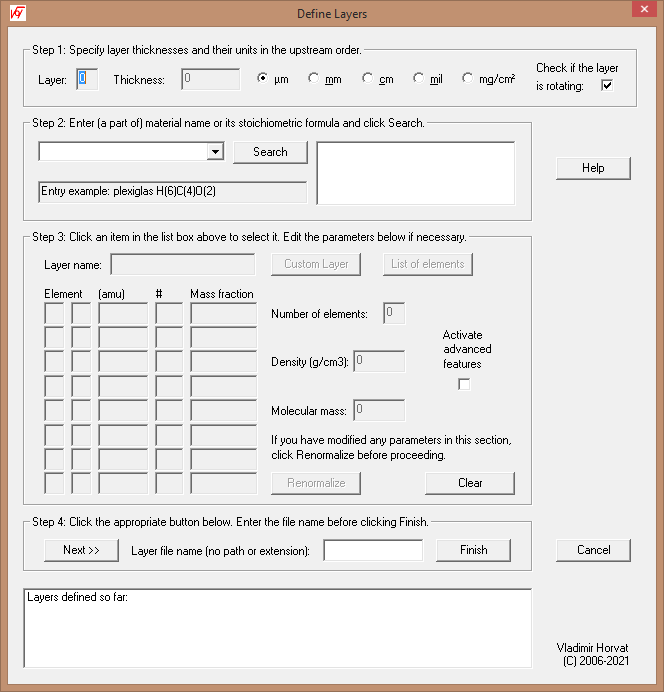
The purpose of this dialog box is to define the target substrate material and layers of other materials through which the
beam passes before reaching the substrate. These layers do not include the aluminum degraders that are used to
regulate the energy and the linear energy transfer (LET) of the ions entering the target material.
The target substrate material is identified as the first entered layer (layer 0). Its thickness HAS TO BE zero. Other than this, it
is specified the same way as any other layer. The layers must be entered IN THE UPSTREAM ORDER.
Procedure:
-
When the program dialog box shows, a message box will pop up as soon as the input focus is shifted from the
edit box displaying the layer number, initially containing 0. The message box will remind the user that the first
layer (layer 0) identifies the target substrate material and that its thickness has to be zero. After the target substrate material layer
is entered, the layer number will automatically be incremented by one and the message box will not pop up.
-
Click the appropriate radio button to select the appropriate units of thickness for the current layer.
-
Click the "Thickness" edit box and enter the layer thickness in the chosen units.
-
Check the appropriate box if the layer is rotating with the target (i.e., is attached to it).
-
Enter the name of the current layer material (or a part of it) in the edit box next to the Search button.
An example showing the format of the records in the data base will be shown in the edit box below the search button.
Frequently used materials (silicon, air-gas, aramica, ...) can also be selected using the pull-down
feature of the edit box next to the Search button.
-
Click Search. In the window on the right you should find a list of all records that contain the
serach pattern that you entered. Click on the desired record to select it. Once the layer is selected, its thickness and the associated unit
can be changed using the radio buttons above.
-
The next step includes advanced features for users with special requests. Other users are advised to skip this step.
The advanced features can be activated by checking the box that is labeled accordingly. Help with the advanced
feautres will be provided on request.
-
When a layer is entered, click the "Next >>" button. Information related to the entered layer will be
displayed in the box below. If the entered layer is the last one, after clicking
the "Next >>" button, enter the name identifying the layer set in the edit box next to it and click
Finish.
-
Click Cancel at any time to exit the program without changing the layer information.

